
The Formatting eLearning Documents series is an overview of various Microsoft Word functions, how to find them, and how best to use them in eLearning. These tutorials are not exact step-by-step directions. The how-to steps in software change so often, the blog would simply become post after post correcting the ever changing tutorials! Can you imagine? We’d have to re-title our blog and everything! Nobody wants that (especially the editors).
In this post, we’ll look at creating both hyperlinks and a Table of Contents (ToC) as the two are related in Word. They are also important items in eLearning, especially if you’re living on the bridge between electronic and print media and need to create content that is both screen and printer friendly.
While I’ve done my best to reflect both Windows and Mac instructions, the screen shots are from Microsoft Word 2016 for PC. When in doubt, do an internet search for your version of the software.
Hyperlinks
According to research from the Nielsen Norman Group, “clicking hypertext links remains the most-used feature” for online users. Readers look for ways to jump around and scan content.
The Nielsen Norman Group also found that “users scan web pages looking for clues as to what the page is about and where to go next. They use sign posts, such as headings and bolded keywords, as shortcuts to information.” You can help your reader by creating meaningful sign posts that guide them through your content, especially if you are working with a large document.
Hyperlinked text should be a simple description explaining where the link is taking the user (CommonLook). A phase like “click here” is not print-friendly nor is it accessible to users with screen readers.
Instead, use a phrase such as “see Appendix” (internal link) or “go to ModeleLearning.com” (external link). The reader can click on the link or (if printed) visit the location or website by entering the given address. Remember that a long url can be cumbersome to find, and a screen reader will read every character. So, be mindful of the addresses in your external hyperlinks and adjust accordingly.
There are two types of hyperlinks in an e-document—internal and external.
External Links
External links are fairly simple and straight-forward. They function the same as a hyperlink on a web page. The quickest way to link to a web page is to:
- Highlight the phrase or heading
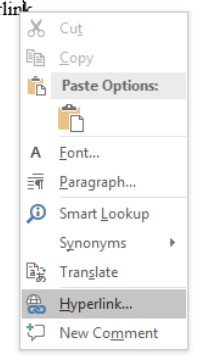
- Right-click (PC) or CMD + Click (Mac) on the highlighted text
- Enter the web page address
-
Select OK
Internal Links
Remember my earlier blog post with an example of an internal link in the Pocket Prof text? The words “see page 18” are in both written form (print) and hyperlinked (electronic).

Let’s take a look at how to create an internal link.
First: bookmark your location
To create an internal link, you first need to bookmark your section (in this case, the topic from page 18).
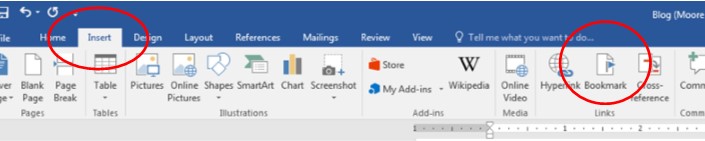
You’ll find the bookmark button in the “Insert” ribbon. Think of a hyperlink as an “insert” or “attachment.” You’re attaching or linking some sort of content, so the button lives in the same area as buttons for “attaching” photos, extra pages (page breaks), text boxes, etc.
To bookmark a section of your document:
-
Highlight the phrase or heading
- Select the bookmark button
- Give your bookmark a title
- Select Add
Second: link your bookmark
Now, you can create a hyperlink to your bookmark:
-
Select your phrase (in this case “see page 18”)
- Right-click (PC) or CMD + Click (Mac) to create a hyperlink. However, instead of entering the web page address, first go to “Place in This Document.”
-
Select the bookmark
-
Select OK
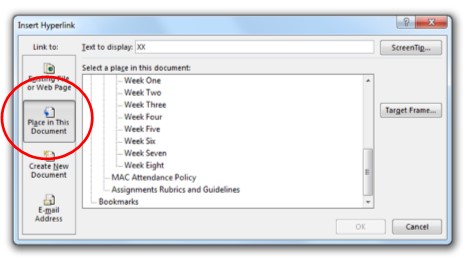
You’ll see a list of headings and your bookmarks. Select your desired bookmark (or heading), and you’re done! Now “see page 18” is also a shortcut to your bookmarked section.
This also works with your existing headings, which I will discuss below in the Table of Contents.
Table of Contents
Ideally, your eLearning documents are short, to-the-point, and don’t need a ToC. But we all know this isn’t always the case (we can think of some syllabi guilty of this). A ToC is a must for large documents that can be both online and printed (e.g., course catalogs, accreditation packs, etc.).
The ToC feature in Word allows you to create headings that automatically populate a Table of Contents. Essentially, it’s a list of internal hyperlinks that helps the reader navigate the document.
Let’s check it out!
First: format and create your headings
The ToC comes from using the Headings feature in Word. So, you will first need to create and format your headings.

It took me a while to remember how to access the tool that formats headings. When in doubt, right-click (PC) or CMD + Click (Mac) on the Heading. In the photo below, I right-clicked on Heading 1.
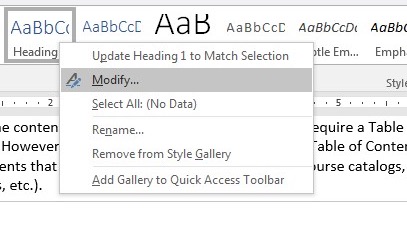
And this pops up.
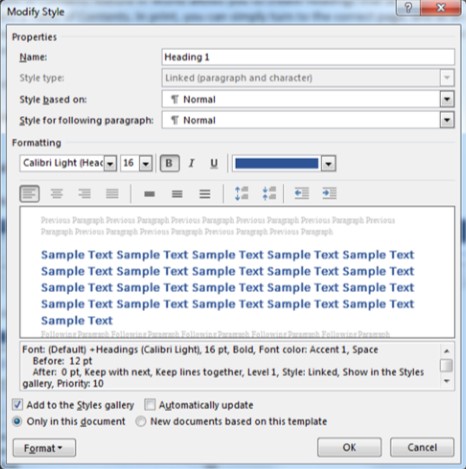
Doesn’t the above box look so scary?! I’m not sure why we need 4 lines of “Sample Text.” If it seems overwhelming, know that you only need to concern yourself with the Formatting section.

That’s better.
You just need to format your Heading 1 and click “OK.” Now, when you select a title or phrase in your document and give it this heading, Word automatically changes the heading to this style.
Of course, some of these features may change with software updates. But, I hope this gives you a general idea of how to find and format your headings. You can always use the default settings, too.
Second: Let’s create that Table of Contents
Can I be honest? I can never find the button for the ToC! It is usually in the Reference area, but it’s still not intuitive for me. It takes a bit of pain and searching, but once you find it, you only have to format and insert it once.

There are a couple automatic ToC that I would suggest you use if you are new to creating these. However, if you want to venture into changing the style, you can customize your table’s font, size, color, etc. I would suggest finding a current step-by-step tutorial as there are many steps and windows involved in forming a custom ToC.
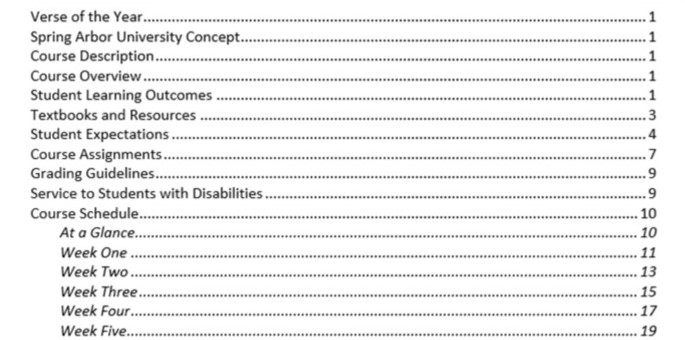
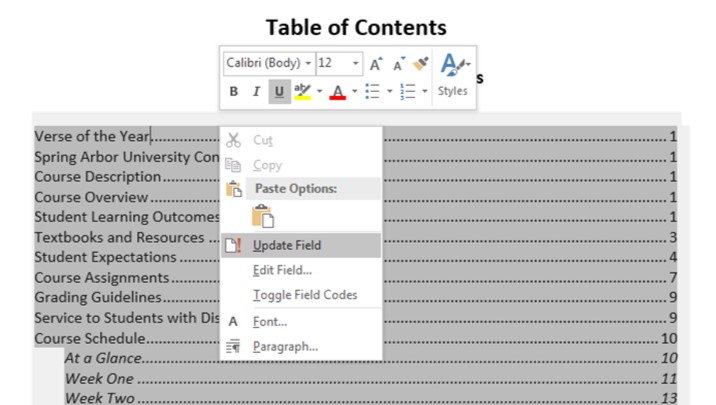
Your ToC will automatically populate with your Headings and their page numbers. Once you place your ToC in the document, you only need to right-click (PC) or CMD + Click (Mac) and update it when you make changes in your document.
If you have a very large document, I suggest you place an internal hyperlink in the footer back to the ToC. This acts a home page for your reader.
Because the link serves no purpose if printed, I recommend you place it at the end of the document. Placing this link in the footer also aids in accessibility. When you convert a Word document to Adobe PDF, headers and footers become artifacts that a screen reader can ignore (Levelaccess). And, someone listening to a screen reader will be very grateful not to hear “table of contents” after every page and likely midway through paragraphs. Remember, not all screen readers follow the same rules. So, be thoughtful about the necessity of items in your headers and footers.
Formatting can be Hard Work, But it’s Worth It
Hyperlinks and a Table of Contents can be a bit of work on the front end. But, as we saw in the Pocket Prof example that I shared in my last post, the end product is a document with easy shortcuts that can be electronic or printed.
Do you have any questions about creating links, or would you like more detail about how to format your Table of Contents? Post a comment below!
References
CommonLook. (n.d.). Accessible hyperlinks (MS Word). Retrieved from https://commonlook.com/resources/manuals/user-guide-commonlook-office-word/hyperlinks/
Heineman, K. (2017). Microsoft word accessibility series: Conversion to PDF q&a webinar resources. Retrieved from https://www.levelaccess.com/microsoft-word-accessibility-series-conversion-to-pdf-qa-and-webinar-resources/
Kellogg Community College. (2017). The pocket prof: A composition handbook. Retrieved from http://www.kellogg.edu/upload/pdf/PocketProf.pdf
Microsoft. (n.d.). Format or customize a table of contents. Retrieved from https://support.office.com/en-us/article/format-or-customize-a-table-of-contents-9d85eb9c-0b55-4795-8abb-a49885b3a58d
Nielsen Norman Group. (2008). How little do users read? Retrieved from https://www.nngroup.com/articles/how-little-do-users-read/
Nielsen Norman Group. (2014). Writing hyperlinks: Salient, descriptive, start with keyword. Retrieved from https://www.nngroup.com/articles/writing-links/

2 thoughts on “Formatting eLearning Documents: Hop, Skip, and a Hyperlink”